
티스토리 뷰
이 글은 udemy의 <Certified Kubernetes Administrator (CKA) with Practice Tests > 강의를 들으며 자격증 공부 목적으로 내용을 정리한 글입니다.
https://www.udemy.com/course/certified-kubernetes-administrator-with-practice-tests
Certified Kubernetes Administrator (CKA) Practice Exam Tests
Prepare for the Certified Kubernetes Administrators Certification with live practice tests right in your browser - CKA
www.udemy.com
Pre-Requisites
[Switching]
switch A 192.168.1.0
- computer A (eth0): 192.168.1.10
- computer B(eth0): 192.168.1.11
- A and B can now communicate with each other through the switch.
- The switch can only enable communication within a network which means it can receive packates from a host on the network and deliver it to other systems within the same network
switch B 192.168.2.0
- computer C (eth0): 192.168.2.10
- computer D (eth0): 192.168.2.11
[Routing]
- A router helps connect two networks together
- it connects the two separate network(switch 192.168.1.0, switch 192.168.2.0)
- Router gets two ip address
- 192.168.1.1 (스위치 A와 연결되는 ip)
- 192.168.2.1 (스위치 B와 연결되는 ip)
- router connected to the two networks that can enable communication between them
□when computer B tries to send a packet to system C ?
- network: room
- gateway: door to the outside
route- this command displays the kernels routing table
ip route add 192.168.2.0/24 via 192.168.1.1

#ip route add <switch network> via <gateway>
- this has to be configured on all the systems
- if the system C is to send a packet to system B
ip route add 192.168.1.0/24 via 192.168.2.1- suppose these systems need access to the internet(access to Google at 172.217.194.0 network)
ip route add 172.217.194.0/24 via 192.168.2.1- if you don't know a route to use this router as the default gateway. this way any request to any network outside of your existing network goes to this particular router
ip route add default via 192.168.2.1
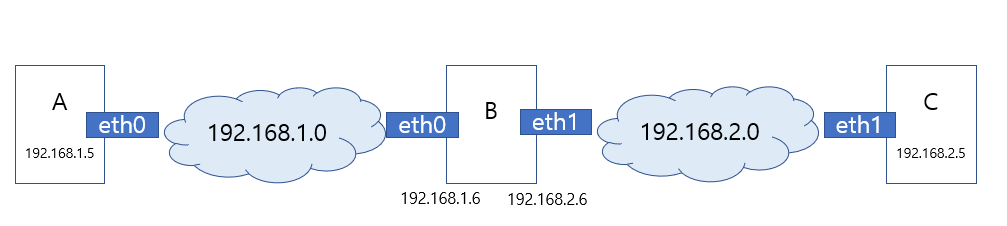
□ A to talk to C?
ip route add 192.168.2.0/24 via 192.168.1.6
□ C to talk to A?
ip route add 192.168.1.0/24 via 192.168.2.6
□ we can allow host B to forward packets from one network to the other
- setting in this system at file /proc/sys/net/ipv4/ip_forward
echo 1 > /proc/sys/net/ipv4/ip_forward
1
※ip addr add commands are only valid till ad restart. If you want to persist these changes you must set them in the /etc/network/interfaces file
ip route
route
ip route or route command is used to view the routing table.
ip route add 192.168.1.0/24 via 192.168.2.1
[DNS]
switch A 192.168.1.0
- computer A (eth0): 192.168.1.10
- computer B(eth0): 192.168.1.11
- ping 192.168.1.11 (ㅇ)
- ping db (X)
cat >> /etc/hosts
192.168.1.11     db
192.168.1.11     www.google.com

# ping db (ㅇ)
# ping www.google.com (ㅇ)
-the environment grew and these files got filled with too many entries and managing these became too hard
- if one of the server's ip changed, you would need to modify the entries in all of these hosts
- DNS server: all these entries to a single server who will manage essentially
cat /etc/resolv.conf
nameserver    192.168.1.100
-once resolv.conf is configured on all of your host, every time a host comes up across a hostname that it does not know about it, it looks it up from the DNS server
/etc/hosts
192.168.1.115      test

dns server
192.168.1.116      test
- in this case, the host first looks in the local /etd/hosts file and then looks at the nameserver
/etc/resolv.conf

nameserver     8.8.8.8
- 8.8.8.8 is a common, well known public nameserver available on the internet hosted by Google that knows about all the websites on the Internet
- You can have multiple nameservers like this configured on your host
□Domain
www.facebook.com www.kubernetest.io www.google.com
-It's called a domain name and it is how IPs translate to names that we can remember on the public internet
-the reason they are in this format separated by dots is to group like things together
| .com .net .edu .org .io | top level domain |
| domain name | |
| www | subdomain |
□검색후 결과가 나오는 과정
apps.google.com
1) when you try to reach any of these domain names, yout request first hits your organization's internal DNS server.
- it forwards your request to the internet.
2) On the internet, the ip address of the server serving appstore, maybe resolve with the help of multiple DNS servers, a routine server looks at your request and points you to a server serving .com
3).com server looks at your request and forwards you to Google
4)Google's DNS server provides you the IP of the server serving the app's applications
□nslookup/dig
ping may now always be the right tool to test DNS resolution
-nslookup: to query a hostname from a DNS server
nslookup www.google.com
dig www.google.com
-do not show /etc/resolv.conf
[Core DNS]
[Network Namesapces]
- network namespaces are used by containers like Docker to implement network isolation
- this can be seen when you list the processes from within the container
ps aux- when you list the same processes as a route user from the undelyuing host, you see al the otehr process along with the process running inside the container(diffrent process ID)
- when it comes to networking, our host has its own interfaces that connect to the local area network
- our host has its own routing and our tables with information about rest of the network
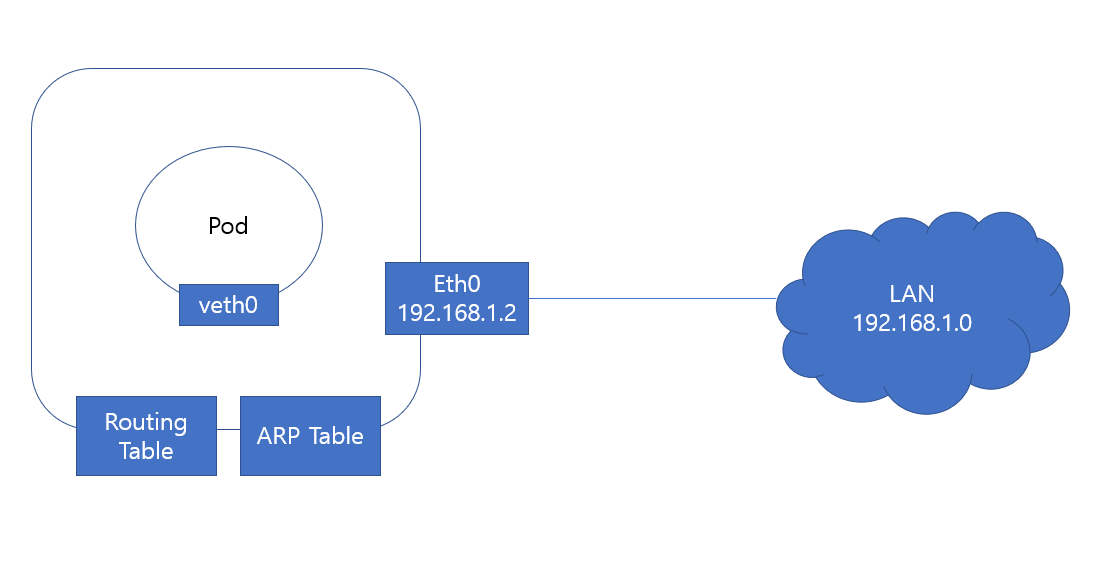
-when the container is created with a network namespace for it, it has no visibility to any network related infromation on the host within its namespace
-within namespace, the container can have its own virtual interfaces, routing and other tables
-the container has its own interface
# red라는 네임스페이스 추가
ip netns add red

# red  네임스페이스 안에서 명령
ip netns exec red ip link
ip -n red link #위와 똑같은 명령어
□Establishing connectivity between the namespaces themselves
-using a virtual ethenet pair or a virtual cable (virtual 케이블을 만드는 방법)
#to create cable
ip link add veth-red type veth peer name veth-blue

#to attach each interface to the appropriate namespace
ip link set veth-red netns red
ip link set veth-blue netns blue

#assign ip
ip -n red addr add 192.168.15.1 dev veth-red
ip -n red addr add 192.168.15.2 dev veth-blue

#link up
ip -n red link set veth-red up
ip -n blue link set veth-blue up
이런 다음에
ip netns exec red ping 192.168.15.2를 하면 ping 이 됨
확인은 arp테이블 보기
ip netns exec red arp
ip netns exec blue arp
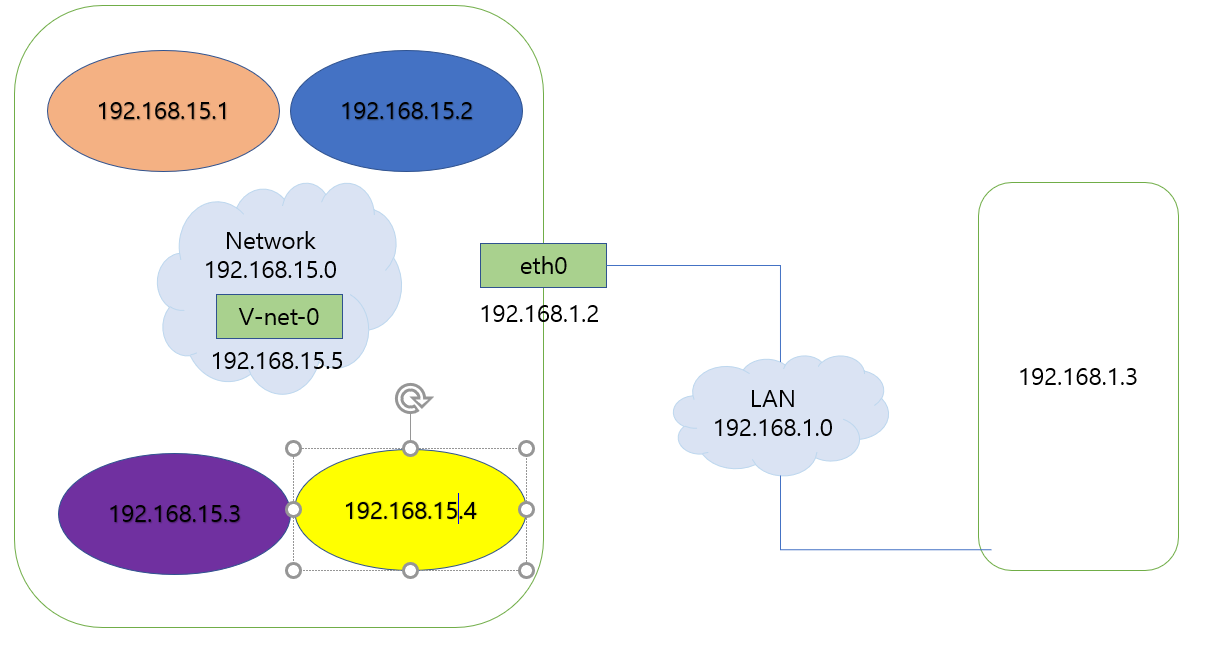
□Linux Bridge 방법
ip link add v-net-0 type bridge
ip link
ip link set dev v-net-0

ip link add veth-red type veth peer name veth-red-br
ip link add veth-blue type veth peer name veth-blue-br

ip link set veth-red netns red
ip link set veth-red-br nmaster v-net-0
ip link set veth-blue netns blue
ip link set veth-blue-br nmaster v-net-0

ip -n red addr add 192.168.15.1 dev veth-red
ip -n blue addr add 192.168.15.2 dev veth-blue

ip -n red link set veth-red up
ip -n blue link set veth-blue up

ip addr add 192.168.15.5/24 dev v-net-0
이제 ping 가능
□gateway
만약 blue에서 192.168.1.3을 접속하면
ip netns exec blue ping 192.168.1.3
connect: Network is unreachable
이뜬다
ip netns exec blue routegateway는 system을 다른 네트워크와 연결한다.
-그래서 로컬 호스트가 두개의 네트워크(blue, 192.168.1.3)을 연결하는 게이트웨이가 된다
ip netns exec blue ip route add 192.168.1.0/24 via 192.168.15.5이제 ping 가능
□home network we tried to reach the external internet through our router
- out home network has our internal private IP address that the destination network don't know about
- so they cannot reach back for this
- our host acting as the gateway here so that it can send the messages to the LAN in its own name with its own address
iptables -t nat -A POSTROUTING -s 192.168.15.0/24 -j MASQUERADE-post routing chain to masquerade or replace the from address on all packets coming from the source network
ip netns exec blue ping 192.168.1.3이제 ping 가능
□192.168.1.3에서 내부 접속(blue)
-ping 불가
-방법 2가지
1) to give away the identity of the private network to the second host
-add an IP route entry to the second host, telling the host that the network wanted
2) to add a port forwarding rule using IP tables
iptables -t nat -A PREROUTING --dport 80 --to-destination 192.168.15.2:80 -j DNAT- any traffic comming to port 80 on localhost is to be forwarded to Port 80 on the IP assigned to the blue namespace
[Docker Networking]
□networking option
1) none
2) host
3) bridge (default)
- docker0
- an internal private network is created which the docker host and containers attach to
- the network has an address 172.17.0.0
- after docker run command, ip netns command show the namespaces created by docker
- namespaces start with b3165
- ip link command를 하면 브릿지 이름을 알 수 있음: vethbb1c343@if7
□how does docker attach the container or its network namespace to the bridge network?
- it creates a cable, a VIRTUAL cable with two interfaces on each end.
ip -n b3165c10a92b

eth0@if8
localhost가 192.168.1.10일떄
docker run -p 8080:80 nginx
curl http://192.168.1.10:8080
docker run으로 8080:80 을 하게되면
iptables -nvL -t nat의 chain DOCKER에서 포트포워딩 된 것을 확인가능하다.
[CNI]
- docker networking is pretty much the same way with Linux Network Namespaces except it uses different naming patterns
- the bridge program takes care of the rest so that the container runtime environments are relieved of those tasks
- for example, whenever rkt or kubernetes creates a new container, they call the bridge plugin and pass the container id and namespace to get networking configured for that container
- A standard that defines, how a programm should look, how container runtime will invoke them so that everyone can adhere to a single set of standards and develop solutions that work across runtime
-CNI: is a set of standards that define how programms should be developed to solve networking challenges in a container runtime environment
- the programs are referred to as plugins
- CNI specifies that it is responsible for creating a network namespace for each container
- identify network the container must attach to
- container runtime to invoke netwrok plugin (bridge) when container is ADDed
- container runtime to invoke netwrok plugin (bridge) when container is DELETED
- JSON format
- the plugin should take care of assigning IP addresses to the PODs and any associated routes required for the containers to reach other containers in the network
- At the end the results should be specified in a particular format
- Any runtime should be able to work with any plugin
- supported plugins: bridge, VLAN, IPVLAN, MACVLAN, windows, DHCP, host-local
- third party plugin: flannel, cilium, calico
- docker does not implement CNI. DOcker has its own set of standards known as CNM(container network model)
- if you want to user docker with cni, create docker container without ant network configurationand than manually invoke the bridge plugin yourself
'Reflection' 카테고리의 다른 글
| cka05 lifecycle management 정리한 것 (0) | 2021.09.18 |
|---|---|
| cka04 Logging&Monitoring 정리한 것 (0) | 2021.09.18 |
| cka04 Networking 정리한 것 (0) | 2021.09.14 |
| cka02 Scheduling 정리한 것 (0) | 2021.09.11 |
| cka01 core concepts 정리한 것 (0) | 2021.09.11 |